Best Mini-Split Wall Bracket, and When a Pad or Stand Is Better
By Cal Dunwoody · Updated October 2026
Independent editorial guide. We never accept payment for coverage, though we may earn a commission if you purchase through our links.
Quick Take
Put the outdoor unit on the ground if you can, on a pad or on a stand tall enough to clear your snow, and use a wall bracket when the ground won't work and the wall is solid brick or concrete. Every manual we checked (MrCool, Pioneer, Senville, Klimaire and Della) allows a bracket and asks for a wall that holds at least four times the unit's weight; Della's applies that to the bracket too. Our default bracket, the Appli Parts APAB-3160, is listed for 352 lb, which by that rule covers outdoor units up to 88 lb.
The catch with a wall mount is noise. Five owners describe a hum or vibration carried into the house through the wall, and rubber or anti-vibration pads didn't cure it for three of them. Next to a bedroom or on a wood-frame wall, we'd go to the ground first. And pick the mount before the lines are connected: moving a connected unit later is installer work.
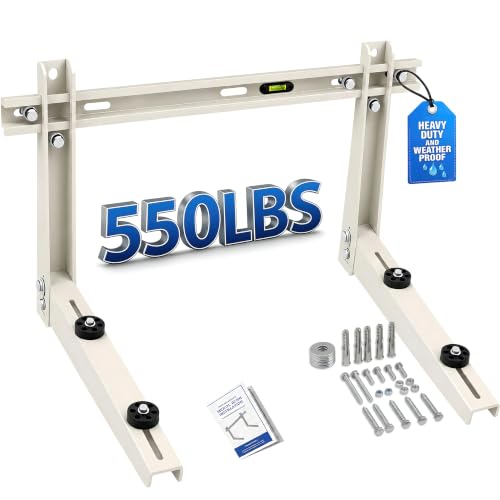
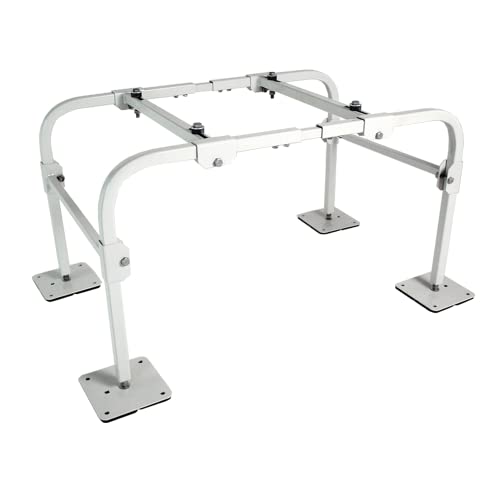
Our 352 lb default, a 550 lb listing with a disclosure, DiversiTech's pad, RectorSeal's 500 lb trade bracket and an 18-inch stand for snow country are below. See picks ↓

The outdoor half of a mini-split weighs about 52 to 152 pounds across the units we checked, runs a compressor that changes speed all day, and sheds water in heating mode. It needs a level, solid base with air around it. You have three ways to give it one: a plastic or concrete pad on the ground, a steel stand that lifts it off the ground, or a bracket bolted to the house.
Mounting is the structural part of a DIY install. If the bracket or the wall gives up, the unit comes down with the line set attached, so this is the one place we'd rather you overbuild. If you're still choosing the unit, start with our best DIY mini-split guide; the unit's weight decides most of what follows.
Ground first, wall when you must
Go to the ground when you can. Della's manual is the plainest about it: the unit "should ideally be placed on a elevated concrete pad," and it "can be fixed on a wall mounting bracket if there is no ground mounting option." The other manuals list ground and wall as equal options. Owner experience pushes the same way.
A wall-mounted unit carries a hum into the house often enough that we plan around it. It comes through a bedroom wall behind a Della running hard, and through a brick wall behind a Mitsubishi in winter heating; several anti-vibration pads later, that owner moved the unit to a ground pad. An unnamed heat pump's low-level vibration is very noticeable under heavy load, a Pioneer sends compressor noise through the wall mounts of a garage, and a Senville Leto makes a winter noise that carries through the wall. Almost every report ties it to hard running or winter heating, when an inverter compressor works hardest. Not everyone gets it: one owner in Florida, where they say most units hang on hurricane-rated brackets, has never had a vibration problem.
You'll hear plenty of warnings about wall vibration, a few claims that inverter units barely vibrate, and the sensible middle view that it depends on whether the wall is concrete or wood. We'd use a wall bracket in three cases: the ground spot is a walkway, a mower path or a drift line; you need height and have a masonry wall; or the line set won't reach a ground spot. Otherwise a stand or pad keeps the compressor off the house.
What the manuals require for a wall mount
These are the rules from the install manuals of five DIY lines, quoted where the wording matters:
- MrCool DIY 5th Gen and Senville Aura: anchor the unit to the ground or to a wall-mounted bracket with M10 bolts. The wall must be made of "solid brick, concrete, or of similarly strong material" and support at least four times the unit's weight. Check that the brackets are level, and "if allowed," add rubber gaskets to reduce vibration and noise.
- Pioneer: the same four-times wall rule. Fasten the brackets "using hardware that is particularly suited for the type of wall"; four rubber pads are optional. If your bracket has its own rubber isolating pads, Pioneer says to remove the pads on the unit's feet first.
- Klimaire: a solid, level surface that supports four times the unit's weight, a wall of "solid brick, concrete, or an equivalent material" that does the same, and a wall bracket that is "corrosion-resistant, securely anchored, and level." Klimaire lists four vibration pads with the outdoor unit.
- Della: "The wall mounting bracket and the wall must be able to support at least 4 times the weight of the outdoor unit." The bracket isn't included.
Two things stand out. Only Della names the bracket in the four-times rule. MrCool, Pioneer and Senville name the wall, and Klimaire names the wall and the mounting surface. We'd apply it to both, because a bracket's rated load is the only number you can check before you drill. And none of the five manuals names a wood-frame or sided wall. DiversiTech, which makes brackets, says its Quick-Sling wall brackets mount "to siding, concrete walls or studded walls," but your install answers to your unit's manual, and the five we read describe masonry.
Bracket rating vs your unit's weight
Do this before a bracket goes in the cart: find your outdoor unit's net weight, multiply by four, and compare the result with the bracket's rated load. Published outdoor-unit weights from the makers:
Outdoor unit | Net weight | Four times |
|---|---|---|
Pioneer and Della 9K and 12K | 51.8 to 55.1 lb | At most about 220 lb |
MrCool DIY 5th Gen 9k and 12k (DIY-09-HP-C-115D25-O, DIY-12-HP-C-115D25-O) | 65.48 lb | About 262 lb |
Pioneer 18K | 70.5 lb | 282 lb |
Della 18K | 63.9 lb | About 256 lb |
MrCool DIY 5th Gen 18k | 93.48 lb | About 374 lb |
Klimaire DIY 5th Gen 18k (KOIQ18H2-45T) | 90.4 lb | About 362 lb |
Pioneer 24K (YN024GLSI20RPF) | 88.2 lb | 352.8 lb |
Della 24K | 99.2 lb | 396.8 lb |
Klimaire DIY 5th Gen 24k (KOIQ24H2-45T) | 104.7 lb | 418.8 lb |
MrCool DIY 5th Gen 24k | 122.8 lb | 491.2 lb |
MrCool DIY 5th Gen 36k | 152.12 lb | About 608 lb |
Now the brackets. The Appli Parts APAB-3160 is listed for 352 lb, so by the four-times rule it tops out at an 88 lb unit: fine for every 9,000 and 12,000 BTU unit above and for the Pioneer and Della 18K, not enough for the MrCool or Klimaire 18k, and just short for the Pioneer 24K (four times 88.2 lb is 352.8 lb). RectorSeal rates its WBB500 at 500 lb, good for a 125 lb unit, which covers the Klimaire 18k and 24k and, with under 9 lb of rated load to spare, the MrCool 24k. None of our wall picks clears four times the MrCool 36k; at that size we'd put it on the ground. This is our arithmetic. None of the bracket makers publishes a safety factor, so we can't tell you whether a rating already includes one. One note on the RectorSeal: its Amazon listing, sold by Amazon under RectorSeal's brand and part number 87735, includes a stray bullet calling it "an aftermarket of generic part." RectorSeal's own page lists SKU 87735 as the WBB500, and our figures come from that page.
Read listing ratings as claims, and check that they agree with themselves. DiversiTech's data sheet for its Hef-T-Bracket 230-B2L says it "holds up to 220 pounds," while its Amazon title says 500 lb; we left it out. The CILVICC bracket in our picks is titled 550 lb for 9,000-36,000 BTU units, but its listing gives the model number MSWB-7K12K-400HD, which looks like a 7,000-12,000 BTU, 400 lb part. CILVICC's separate listing for a 396 lb, 7,000-12,000 BTU bracket carries that same model number, and we couldn't find a CILVICC page that settles which rating is right. Until it's settled, we'd treat it as the smaller bracket and keep it to 9,000 and 12,000 BTU units, which all weigh well under 99 lb (a quarter of 396 lb).
Your wall: brick, block, veneer, stucco and siding
Solid brick and poured concrete are what the manuals describe. Some installers only put wall brackets into formed concrete foundations and use a stand everywhere else. The anchors matter as much as the bracket. MrCool's wall steps fix the bracket to the wall with expansion bolts and the unit to the bracket with M10 bolts (close to 3/8 inch), and Pioneer's says to use hardware suited to the type of wall; past that, anchor choice is a call for someone who knows your wall. Our bracket picks ship with anchors or wall inserts, and one owner found that's not always enough: the screws that came with their bracket wouldn't tighten in brick, even at the drill size the directions called for, and the bracket wobbled. Ignore listing claims like "on any wall surface" (our top pick's listing says exactly that); the manuals are stricter, and we go by them.
- Solid brick: sleeve or epoxy anchors are the usual advice, and Tapcons can strip out or fail to hold in brick. Hollow brick needs an anchor short enough to grab the brick rather than expand in the void, and the anchors should stay out of the mortar.
- Concrete block: Red Head anchors have worked well in concrete and block for one installer. The hollow-core caution above applies.
- Brick veneer: a single layer of brick with an air space between it and the structural wall. Veneer isn't thick or strong enough for the weight on its own, so the hardware has to reach whatever is behind it. One owner facing that decided a stand on a concrete pad would be simpler, and we agree.
- Stucco over foam (EIFS): one owner planning a bracket for an 83 lb outdoor unit on an EIFS wall worked out metal spacer sleeves through the foam so the lag bolts bear on the structure behind it; the more thorough way is to cut out the foam and install treated wood blocking first. That's a wall repair as much as a mount, and work for someone who knows EIFS.
- Wood frame with siding: none of the manuals we read describes it. If it goes into wood, it needs to be studs, with bracing behind and bolts, and people who've mounted into concrete say concrete keeps the vibration down. If you go this way, it's a structural call for someone who can see inside the wall.
Vibration: pads, isolators and when to give up on the wall
Every manual we checked mentions rubber between the unit and its mount, and none promises it stops the hum. MrCool, Senville and Pioneer say "if allowed," install rubber gaskets. Klimaire's notice says to use anti-vibration mounts when wall-mounting, though its bracket steps list the isolators as optional, and its final check is that isolators are "properly seated and not compressed unevenly." Della says rubber foot pads "can be placed" between the unit and a ground stand or base kit. The Appli Parts and CILVICC brackets and the DiversiTech stand come with rubber pads or isolation washers; RectorSeal's page doesn't list any, so plan on the isolators your manual allows.
Pads help, but two owners with wall vibration already had rubber pads under the unit, and a third tried several anti-vibration pads before moving to the ground. The likely explanation: an inverter compressor runs across a wide range of speeds and will eventually hit a frequency that rings whatever it's bolted to. That fits the reports, which cluster at high output and in winter.
If a wall mount you already have hums, start with a callback to your installer while it's happening, and ask them to check the isolators and whether the piping is carrying vibration into the wall. If that doesn't fix it, plan a move to a ground stand with them. Don't loosen the bracket or add spacers yourself; any fix has to keep the support and anchoring intact.
Snow, clearances and drainage
Height is where a wall bracket or a stand earns its money. A heat pump in heating mode pulls heat through the outdoor coil and drops defrost water from its base, so the unit has to stay above the snow and the water has to fall clear. Della's manual recommends installing the unit "above the seasonal snow level" in snowy regions, on an elevated stand with a snow cover. Klimaire's says to keep adequate ground clearance from rainwater, snow and ice. MrCool's and Pioneer's say to take measures against ice buildup where snow is expected. None of them gives a number.
The usual advice puts it at 17 or 18 inches. You'll also hear that stands are unnecessary because units heat their base to melt snow; we side with the manuals. As in our mini-split not heating and defrost mode guides, set the bottom of the unit above the deepest snow you see in a normal winter, with room under it for meltwater to fall and drain away. A 3-inch pad doesn't do that anywhere snow piles up, and a plastic pad can slow defrost water out of the base, where it refreezes; that was the diagnosis on one iced-up unit. A stand or wall bracket that's tall enough for your snow does.
Clearance to the wall can change with the mount. Pioneer's diagram allows 4 inches behind the unit on wall brackets but 12 inches on a slab. Klimaire's table lists 12 inches at the rear and a separate 4-inch minimum "when wall-mounted" without naming the side. MrCool's and Senville's shared diagram, which doesn't separate slab and bracket, shows 4 inches at the back and the left end, 14 inches at the right (valve) end and 20 inches above and in front, each with conditions. Check yours: one owner's manual asks for just 2 inches. And if you hear that brackets can't give the required clearance, that's backward for these manuals: Pioneer's and Klimaire's ask for less room on a wall mount, not more, and MrCool's and Senville's ask for 4 inches at the back either way.
Drainage changes too. Pioneer's manual says the drain joint and tubing aren't needed on a slab. On a bracket or stand the water falls from height, so plan where it lands: not on a walkway that will freeze, and not on a deck. MrCool's manual says that in cold climates the outdoor drain hose should be as vertical as possible so water doesn't freeze in it.
Pads and stands: the ground options
A pad gives the unit a flat, level base and does nothing about height. DiversiTech's E Lite EL1838-3 is 18 by 38 by 3 inches, rated for 1,000 lb, made of UV-inhibited polypropylene and drillable so the unit can be bolted through it. Either way, the manuals expect the unit bolted down: MrCool's ground steps use four expansion bolts into the ground or a concrete platform, and Della's call for anchoring the stand or base kit to concrete with anchor bolts.
A stand lifts the unit and keeps it off the house. DiversiTech's Quick-Sling QSMS1801 is 18 inches tall and rated for 400 lb, with rubber-padded feet that adjust up to 1.25 inches and anti-vibration isolation washers in the box; DiversiTech says it keeps the unit above mowers, pets, snow and flooding. It comes in 12, 18 and 24 inch heights, each in thin, wide and extra-wide versions, so match the version to your unit's foot-bolt spacing before ordering (DiversiTech's fit tool doesn't list MrCool, Pioneer, Senville, Della or Klimaire), and set it on a level concrete pad or slab. Our mini-split stand guide covers heights and fit. It costs a lot more than any bracket here. In snow country with a wall that isn't masonry, it's the one we'd buy.
The ground has trade-offs too. For a weekend DIYer who'd been told their brick veneer alone couldn't carry a bracket, a stand on a concrete pad was the less complicated job. On the other hand, a landscaper's mower hit one owner's unit and shifted it on its pad.
Moving a unit that's already installed
Changing mounts after the fact is installer work. The line set moves with the unit, and the slack often isn't there. The owner whose unit got hit by the mower wanted to move it from the pad to a wall bracket; the line set looked too short, bending it risks a kink, and the firm that installed it quoted a price the owner found hard to believe.
On a pre-charged quick-connect system, the manual spells out the risk of opening the lines. MrCool's says its outdoor coupling uses tapping rings: "If you disconnect and reconnect the refrigerant pipes, it could cause it to leak. This will also void the warranty." Its safety section adds that when moving or relocating the unit, you should "consult experienced service technicians for disconnection and re-installation of the unit." Lifting a connected unit onto a new mount can strain the same copper. Choose the mount before the lines are connected, plan the line set cover route at the same time, and if the mount has to change later, let the installer handle the unit and the lines.
The picks
Products we recommend for this guide.



What owners say
Real owner reports from the threads and editorial sources we drew on for this guide.
“Had a guy install a Della mini split in my room last month using a wall bracket. It cools well, but when it’s running really hard, I can lowkey feel a hum through the wall. It’s not too loud, just annoying when I sleep. There are some rubber pads under it.”
“I had a Mitsubishi unit mounted on a brick wall for a few years and I was feeling vibration on that side of house in winter months when unit was in hyper heat mode, summer months were ok. Tried multiple anti vibration pads but nothing worked, moved it to a ground pad later”
“I have a wall-mounted heat pump, rubber pads and all. The low-level vibrations are very noticeable when the unit is running under heavy load.”
“I live in Florida and my mini split and most that I see are mounted on the side of structures with a hurricane approved bracket. Never had any issue with vibrations.”
“Last summer my landscaper hit it with the mower and shifted it on the pad. Also I wanted it on a bracket from the beginning but ended up going with the pad to get it as close to the house as possible. But they ended up locating it pretty far off the wall.”

