Best Mini-Split Line Set Cover: Width, Length and Retrofit Fit
By Cal Dunwoody · Updated October 2026
Independent editorial guide. We never accept payment for coverage, though we may earn a commission if you purchase through our links.
Quick Take
For a 9,000 or 12,000 BTU single-zone mini-split, buy a 3-inch kit rated a few feet longer than the path from the wall hole to the outdoor unit. Our default is the Nouscan 3-inch 16 ft kit, and Nouscan says every part except the flexible duct splits in the middle, so everything but that one piece can go around lines that are already installed. At 18,000 BTU and up, or with a second line set sharing the channel, we'd step up to a 4-inch kit.
A cover is protection plus looks, and MrCool's own manual says you can buy one separately if you want it. What it protects is the insulation: MrCool says a cover shields the piping from "harsh weather conditions and sun exposure." If you skip the cover, make sure the insulation on the lines is rated for sun. And when you fit one to an existing install, the lines stay connected; you work around them, never by taking them apart.
Our 3-inch default, the cheaper short kit, a 4-inch step up, Pioneer's brand-matched kit and the pro-grade Fortress kit are below. See picks ↓

A line set cover is a plastic channel that screws to the outside wall and hides the copper lines, the communication cable and the condensate drain between the indoor head and the outdoor unit. Every DIY mini-split owner ends up deciding whether they need one, and the kits on Amazon all look alike in the photos. They aren't alike in width, length, which pieces split for retrofit, or what the maker will put in writing about sun and paint.
We picked from the kits we could verify on Amazon and checked each claim against the listing or the maker's own page. If you're still choosing the unit itself, start with our best DIY mini-split guide; this one assumes the head is on the wall or about to be.
Do you need a line set cover at all?
Not strictly. A cover is mostly about looks, a bare run is an acceptable install, and you'll hear line hide called "a cosmetic product." It still does something for the insulation, which is MrCool's point. Its DIY 5th Gen manual treats the cover as an extra you buy separately and says it protects the lines from weather and sun exposure, "which will extend the life of your system."
The part that isn't cosmetic is the insulation. The foam on a mini-split line set keeps the lines from sweating, and plain foam doesn't hold up well in sun. One owner whose lines ran bare up three stories had the installer come back to replace all the copper; in their words, the insulation deteriorates and often pits the lines. White insulation flakes off in weather and sun. That's one owner's account, but it's the failure a cover is there to prevent.
On a sunny wall, buy the cover. It's cheap next to the unit, and it's the easiest way to protect insulation you can't easily replace on a pre-charged line set. On a shaded wall with UV-rated insulation, skipping it is a reasonable call; if the lines stay bare, the insulation should be the UV-resistant kind.
Width: matching the cover to the bundle
The cover has to swallow two insulated copper lines, the communication cable and usually the drain hose. Kit makers rate width by system size rather than by a line diameter, so here's what they publish:
Kit | Width | Rated for |
|---|---|---|
Pioneer 3-inch | Internal cross-section of 3 x 2.5 inches | 9,000 and 12,000 BTU systems "as well as most 18,000 BTU capacities" |
Pioneer wide | 4 x 3 inches | 24,000 BTU and above; holds two small line sets of 18,000 BTU or lower, per Pioneer |
Nouscan 3-inch 16 ft | 3 inches | 7,000-24,000 BTU |
LyPrem 3-inch 10 ft | 3 inches | 7,000-24,000 BTU |
Nouscan 4-inch | 4 inches | 7,000-36,000 BTU |
RectorSeal Fortress | 3.5-inch and 4.5-inch sizes | No figure; the listing doesn't tie either to a BTU range |
Notice the overlap: Pioneer puts 18,000 BTU at the top of its 3-inch range, while two other makers stretch 3 inches to 24,000. A bigger unit usually runs a bigger suction line, and thick insulation adds up fast. One owner put 1/4 and 3/8 inch lines in one inch of insulation inside a 3-inch cover, and that's a 12,000 BTU unit. Pioneer's listing tells you to make sure your line set fits inside before you buy, so measure the taped bundle. We'd go further than the makers: at 18,000 BTU or above, or if the bundle measures close to 3 inches across, buy the 4-inch kit. A cover that's a little loose costs nothing; one you can't snap shut is a return.
Bends need room too. MrCool's manual gives a minimum bend radius of 4 inches for the refrigerant piping, and hand-bent lines need a few inches of radius at every corner, which means extra clearance inside the cover's elbows. Lay the bundle where the cover will go before you buy elbows, and count the turns.
Length: do the arithmetic before you order
Measure the path, not the line set. Start at the wall hole, follow the route the cover will take down and across the wall, and stop at the outdoor unit's valves. Then compare that number with what the kit can cover, which isn't always the sum of its straights:
- Pioneer: its page lists four 39.5-inch straights (its Amazon listing says 39-3/8), about 13 feet of straight run, but Pioneer says the kit covers 10-12 feet of exposed piping. Pioneer doesn't explain the gap; go by the 10-12 ft figure and expect to lose some length to cuts and joints.
- RectorSeal Fortress: the Amazon listing says the 84005 kit covers "up to a 12-ft lineset run," while RectorSeal's own release describes 7.5 ft duct lengths. Read the kit title, not the duct length.
- Nouscan 16 ft: the kit matches a 16 ft line set, a length several DIY units ship with, but the route on the wall is usually shorter than the line, because some line stays coiled or tucked behind the unit. If your path is longer than the kit, you'll need extra straights and couplers; Pioneer, for one, sells a straight and coupler by itself.
Buy a kit rated a few feet longer than the measured path. Extra straight sections cut down with a fine-tooth saw; a short kit means a second order and a color that may not match.
Fittings and retrofit: what has to go on first
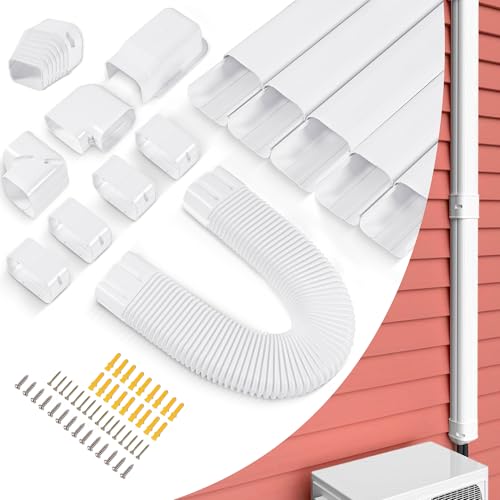
A kit is a base channel with snap-on lids, plus fittings: a wall cap (or wall inlet) where the lines leave the house, flat and vertical elbows, couplers between straights, a flexible section for odd angles, and an end fitting at the outdoor unit. On a new install you assemble around the lines as they go up. On an existing install, the question is which pieces can open up to go around lines that are already connected.
Pioneer's Amazon listing is blunt about it: the kit can be added to an existing installation "with the exception of the Flexible Piece and the Wall Cap, which have to be installed during or prior to connecting the lines." Pioneer's own product page is looser, saying the covers "can be installed over existing pre-installed pipes as well." The two don't square, so we'd plan around the stricter wording: on an existing install, expect the straights and elbows to go around the lines and the wall cap and flexible piece to stay in the box unless they fit without opening anything. Nouscan says every part of its 16 ft kit except the flexible duct can be separated in the middle, and every part of its 4-inch kit. On a retrofit, that's the feature to look for.
What you don't do is disconnect anything to make a fitting slide on. MrCool's manual is direct about its pre-charged lines, whose outdoor couplings use tapping rings: "If you disconnect and reconnect the refrigerant pipes, it could cause it to leak. This will also void the warranty." If a wall cap or flexible piece won't go on without opening the lines, leave it off and finish the run without it, or use a kit whose pieces split. Opening a connection is never part of fitting a cover. If a fitting needs it, that's a job for an installer, and on a MrCool pre-charged set the manual's warning above still applies. The same goes for the cable: if it's in the way, move the cover's path, not the wiring, and leave anything at the disconnect to an electrician.
Go easy on the copper while you work. One owner who was attaching a line set cover after spray-foaming the wall hole said they were afraid they'd tweaked the copper lines too hard when their unit threw an error (the error turned out to come from the foam, not the lines). Ease the bundle into the channel; don't force it.
Installing a cover: what to expect
This is the easy part of a mini-split, and one an owner can take on even when they hire out the rest. One owner installed the pad and line set covers and left the lines, mounting and electrical to a tech. Don't expect good instructions: one owner called theirs terrible and fit the cover slightly wrong, though it still looked fine.
- Fastening: the base channels screw to the wall and the lids snap on. SUREPHON's listing describes it as screwing the bottom cover to the wall, then snapping on the top; LyPrem calls its kit snap-on. Every pick's listing except Fortress's mentions screws, and Pioneer's lists anchors as well.
- Masonry and siding: on brick, block or stucco you'll want masonry anchors and a masonry bit. On siding, screw into something solid rather than the siding alone.
- Cutting: cut straights with a fine-tooth saw and deburr the edge. Pioneer says its straights can be cut to fit, and Nouscan says the same of its 4-inch kit.
- Order of work: fasten the base before you set the bundle in it, and keep the drain at the bottom (more on that below).
A second-story wall hole changes the job more than the cover does: you'll be on a ladder for every screw.
Condensate drains, cold climates and pumps
The drain is the part of the bundle that causes trouble later. MrCool's manual says the drain hose "must be placed at the bottom of the bundle," and that otherwise the drain pan could overflow. It also says not to kink the hose or create a water trap. A cover that holds everything neatly can hide a sag that traps water, so check the run slopes downhill the whole way before the lids go on.
It doesn't have to live in the cover at all. A common installer approach is to drill a hole and take the drain straight down off a 90, and to hard-pipe any horizontal run rather than use corrugated tubing. One owner found out why the hard-pipe advice exists: the drain tubing that came with their unit had a slice hidden under the insulation and leaked. If you're mounting a condensate pump, some are made to fit inside line hide.
In cold climates, mind the outdoor unit's own drain. Heat pumps shed defrost water in heating mode, and MrCool's manual says that in cold climates the outdoor drain hose should be "as vertical as possible," because slow-draining water "can freeze in the hose and flood the unit." We'd keep that hose out of any horizontal cover run and let it drop straight down. Fortress lists a component temperature range of -4°F to 140°F; nobody else among our picks publishes one.
UV, paint and the claims to believe
Every kit says it's weatherproof. Few say how they know. RectorSeal is the only maker among our picks that publishes a test number: Fortress is "PVC, UV stabilized and fire resistant; tested to over 2,000 hours." RectorSeal's own release says what those hours tested: they were "to verify color stabilization." That's a fade claim, not a lifespan claim, but it's more than anyone else offers. LyPrem calls its PVC and ABS kit "UV-resistant" in the title; Pioneer's page claims "weather-resistant properties" and doesn't mention UV; Nouscan's 16 ft listing claims protection from "various environmental and weather changes."
The flexible section is the weak spot. In strong sun, a flexible piece at the top of a run can go brittle and break down in a year or so, and paint helps it last a bit longer. That warning came to a Pioneer owner from someone who lives with very high UV, where thin plastics don't last long, but it's a cheap risk to manage: keep the flexible piece short and out of direct sun where the route allows.
On paint, go by the maker. Pioneer says its kit is paintable and answered a buyer that "any type of PVC-safe paint" works. RectorSeal says Fortress is brush, spray or roller paintable. Nouscan's 4-inch and LyPrem's listings say the covers can be painted. Nouscan's gray 16 ft listing doesn't say either way; it pitches the gray as matching light or dark walls. If you plan to paint, buy a kit whose maker says you can.
Pests are a fair worry for bare foam. RectorSeal's listing says Fortress protects against "pet and pest damage." No owner report says either way whether a cover stops rodents. One owner did report their goats ate the insulation off exposed lines, and bought covers afterward.
If you skip the cover
Some walls won't take one: on one install, the space beside a window was too tight for a cover, and the bare run was fine. If that's you, ask what insulation is on the lines. UV-resistant insulation should carry a stamp saying so, and it comes in rolls. Keep the run shaded where you can; shade helps bare lines last.
A bare run also exposes the drain, so the slope and freeze points above matter more, not less. If you're already seeing water at the head, our mini-split leaking water guide works through the drain causes in order. And if your unit is the MrCool DIY 5th Gen, its manual's cover recommendation and drain rules are the ones quoted above.
The picks
Products we recommend for this guide.



What owners say
Real owner reports from the threads and editorial sources we drew on for this guide.
“Seems this insulation problem is a known situation. They are replacing all the copper lines. The insulation deteriorates and often pits the lines, causing small leaks.”
“It's ¼ and ⅜ line surrounded in one inch of insulation, inside of a 3 in cover, hopefully it won't be too bad, I'll be finishing the install tomorrow.”


